Nissan Sentra Service Manual: Evap canister
Exploded View
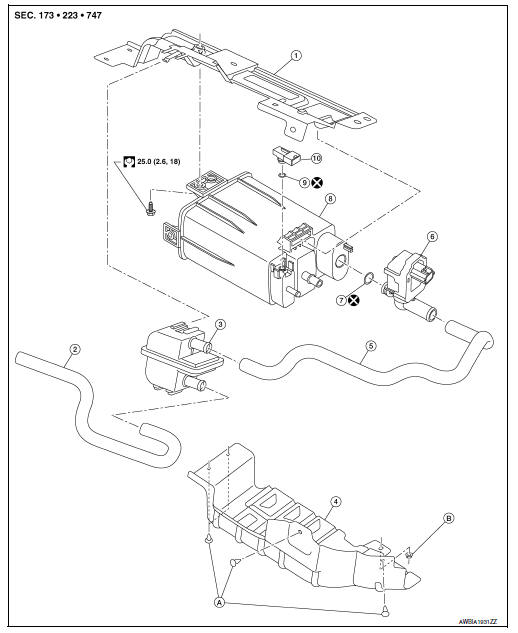
- EVAP canister bracket
- EVAP canister filter drain hose
- EVAP canister filter
- EVAP canister protector
- EVAP hose
- EVAP canister vent control valve
- O-ring
- EVAP canister
- O-ring
- EVAP canister control pressure sensor
- Clip
- Nut
Removal and Installation
EVAP CANISTER
Removal
- Remove EVAP canister protector.
- Disconnect the harness connector from EVAP canister control pressure sensor.
- Remove the EVAP canister control pressure sensor and O-ring, if necessary.
CAUTION:
Do not reuse O-ring.
- Disconnect EVAP canister purge hose.
- Disconnect fuel tank EVAP breather hose.
- Disconnect the harness connector from EVAP vent control valve.
- Disconnect the EVAP vent control valve hose.
- Remove the EVAP canister bolt.
- Remove the EVAP canister.
- Remove the EVAP vent control valve and O-ring, if necessary.
CAUTION:
Do not reuse O-ring.
Installation
Installation is in the reverse order of removal.
CAUTION:
Do not reuse O-ring.
EVAP CANISTER CONTROL PRESSURE SENSOR
Removal
- Remove EVAP canister protector.
- Disconnect the EVAP control pressure sensor harness connector (1).
- Remove the EVAP canister control pressure sensor and O-ring.
CAUTION:
Do not reuse O-ring.

Installation
Installation is in the reverse order of removal.
CAUTION:
Do not reuse O-ring.
EVAP CANISTER VENT CONTROL VALVE
Removal
- Remove EVAP canister protector.
- Disconnect the harness connector from EVAP vent control valve.
- Disconnect the EVAP vent control valve hose.
- Turn EVAP canister vent control valve counterclockwise.
- Clock
- Unclock
- Remove the EVAP canister vent control valve and O-ring.
CAUTION:
Do not reuse O-ring.

Installation
Installation is in the reverse order of removal.
CAUTION:
Do not reuse O-ring.
EVAP CANISTER FILTER
Removal
- Remove EVAP canister protector
- Disconnect the EVAP canister filter drain hose (1).
- Disconnect the EVAP hose (2).
- Remove the EVAP canister filter.

Installation
Installation is in the reverse order of removal.
 Fuel tank
Exploded View
Fuel filler cap
Grommet
Fuel filler tube
Clamp
Fuel filler hose
Fuel tank
Fuel tank mounting band (RH)
Fuel tank mounting band (LH)
Vent hose
Removal and Insta ...
 Disassembly and assembly
FUEL LEVEL SENSOR UNIT
Exploded View
Fuel Level Sensor Unit
Fuel filter and pump assembly
Fuel level sensor unit
Float arm assembly
Fuel tank temperature sensor
Fuel level sensor uni ...
Other materials:
Transaxle side
TRANSAXLE SIDE : Removal and Installation
Remove boot after drive shaft is removed from the vehicle.
For drive shaft removal and installation, follow the instructions bellow.
6M/T: Refer to FAX-18, "6M/T : Removal and Installation (LH)".
Except 6M/T: Refer to FAX-26, "EXCEPT ...
Rear power window switch
Removal and Installation
REMOVAL
Release the pawls using a suitable tool and lift the rear power window
switch and finisher as an assembly
and remove
Disconnect the harness connector from the rear power window switch.
Release the pawl (one on each side) using a suitable tool, then
se ...
U1000 CAN Comm circuit
DTC Logic
DTC DETECTION LOGIC
DTC
Display Item
Malfunction detected condition
Possible causes
U1000
CAN COMM CIRCUIT
When CAN communication signal is not continuously
received for 2 seconds or more
CAN communication system malfunction
Diagnosis Procedure
...
