Nissan Sentra Service Manual: Floor trim
Exploded View

- Floor trim
- Harness protector
- Front floor spacer (RH)
- Front floor spacer (LH)
- Rear floor spacer (LH)
- Rear floor spacer (RH)
- Column hole cover
 Pawl
Pawl
 Front
Front
Removal and Installation
REMOVAL
- Remove front seat assemblies. Refer to the following.
- Refer to SE-18, "DRIVER SIDE : Removal and Installation - Seat Assembly" (Driver Seat).
- Refer to SE-20, "PASSENGER SIDE : Removal and Installation - Seat Assembly" (Passenger Seat).
- Remove rear seat cushion assembly. Refer to SE-23, "Removal and Installation - Seat Cushion Assembly".
- Remove dash side finishers (LH/RH). Refer to INT-26, "DASH SIDE FINISHER : Removal and Installation".
- Remove center pillar lower finishers (LH/RH). Refer to INT-27, "CENTER PILLAR LOWER FINISHER : Removal and Installation".
- Remove rear pillar lower finishers (LH/RH). Refer to INT-30, "REAR PILLAR FINISHER : Removal and Installation - Rear Pillar Lower Finisher".
- Remove lap pre-tensioner anchor bolt. Refer to SB-8, "Removal and Installation".
- Remove center console assembly. Refer to IP-17, "Removal and Installation".
- Remove console rear bracket. Refer to IP-17, "Exploded View".
- Remove rear floor duct. Refer to VTL-7, "REAR FLOOR DUCT : Removal and Installation - Rear Floor Duct".
- Remove shift selector assembly. Refer to TM-253, "Removal and Installation".
- Remove diagnosis sensor unit. Refer to SR-28, "Removal and Installation".
- Remove parking brake lever assembly. Refer to PB-7, "Removal and Installation".
- Remove nut (A) and then remove instrument stay.
- Disconnect drain hose.

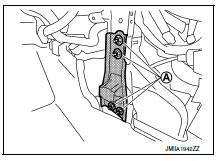
- Remove clips (A) and the column hole cover.

- Release pawl using a suitable tool (A) and open the harness protector.
 Pawl
Pawl

- Remove floor trim.
INSTALLATION
Installation is in the reverse order of removal.
 Rear parcel shelf finisher
Exploded View
Seat belt finisher (RH)
Rear parcel shelf finisher
Rear seatback finisher (RH)
Top tether strap anchor finisher
(RH)
Top tether strap anchor finisher
(center)
Rear ...
 Headlining
Exploded View
STANDARD ROOF
Headlining
Assist grip
Map lamp bracket
Sun visor (RH)
Sun visor cover
Sun visor holder
Map lamp
Sun visor (LH)
Interior room lamp
Assist grip cap ...
Other materials:
Front disc brake
Exploded View
Cap
Bleeder valve
Cylinder body
Piston seal
Piston
Piston boot
Upper sliding pin
Lower sliding pin
Sliding pin boot
Bushing
Torque member
Apply brake fluid
Apply rubber grease
Disassembly and Assembly
DISASSEMBLY
Place a wooden block as shown, and ...
Door sash tape
Exploded view
Front door sash upper tape
Front door assembly
Rear door assembly
Front door sash rear tape
Rear door sash front tape
Rear door sash rear tape
Rear door sash upper tape
Front door sash tape
FRONT DOOR SASH TAPE : Removal and Installation
REMOVAL
Heat door sash ...
Power supply and ground circuit
BCM (BODY CONTROL SYSTEM) (WITH INTELLIGENT KEY SYSTEM)
BCM (BODY CONTROL SYSTEM) (WITH INTELLIGENT KEY SYSTEM) : Diagnosis Procedure
Regarding Wiring Diagram information, refer to BCS-51, "Wiring Diagram".
1.Check fuses and fusible link
Check that the following fuses and fusible link ...
