Nissan Sentra Service Manual: Wiper blade
Wiper blade
WIPER BLADE : Removal and Installation
REMOVAL
- Put the wiper arms in the service position.
- Turn the ignition switch ON and then OFF.
- Within 1 minute, activate washer switch 2 times in less than 0.5 seconds to put the wiper arms in the service position.
- Lift the wiper arm away from the windshield glass.
- Rotate the wiper blade and push the release tab (A), then move the wiper blade down (B) the wiper arm.
- Remove the wiper blade.

INSTALLATION
CAUTION:
Return the wiper arm to the service position on the windshield to prevent damage when the hood is opened.
- Insert the wiper blade onto the wiper arm and slide it up until it clicks into place.
- Rotate the wiper blade so the dimple is in the groove.
- Lay the wiper arm back down in the service position on the windshield.
- Turn the ignition ON and operate the windshield wipers to ensure the
repair has been completed properly.
Operating the windshield wipers will cancel service mode.
- Check that the wiper blade contacts the windshield properly; otherwise the wiper arm may be damaged from wind pressure while driving.
Wiper blade refill
Wiper blade refill : removal and installation
REMOVAL
- Remove the wiper blade. Refer to WW-58, "WIPER BLADE : Removal and Installation".
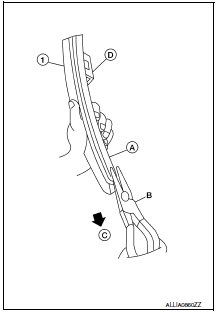
- Hold the wiper blade refill lip at the end (A) of the wiper blade (1)
with a suitable tool (B) as shown and pull it firmly in the direction
(C).
(D): U clip (part of wiper blade)
- If the wiper blade refill lip is torn due to wear, insert a suitable tool (A) into the space between the end of the wiper blade refill (1) and the wiper blade (2) and pull the wiper blade refill (1) out as shown.

INSTALLATION
- If the rib (A) has become detached from the wiper blade refill (1), check that the curve of the rib (A) is in the same direction as the curve of the wiper blade refill (1) and insert the rib (A) into the slit (B) in the wiper blade refill (1) as shown.

- If the rib (A) has a notch (B), insert the rib (A) into the wiper blade refill (1) so the notch (B) fits over the protrusion (C) in the wiper blade refill (1) as shown.

- Insert the wiper blade refill (1) tip into the end of the wiper blade
(2) in the direction (C). Push the wiper blade refill (1) in while
pressing it into the end of the wiper blade (2) as shown. After the
wiper blade refill is fully inserted, remove the holder (B).
(A): Tab (part of wiper blade) (2)

- Make sure to slide the refill into the wiper blade so that the wiper blade refill is held by the tabs (A) on the wiper blade as shown.

- Push the wiper blade refill (1) until the tabs on the wiper blade
(2) fit into the stoppers (A) in the end of the wiper blade refill (1).
Make sure the LOCK mark (B) on the wiper blade refill (1) is aligned with the lock point symbol (C) on the wiper blade (2) as shown.

- Before installing the wiper blade, make sure that the wiper blade refill (1) end is fully covered by the wiper blade (2) in area (A) as shown.

- Install the wiper blade. Refer to WW-58, "WIPER BLADE : Removal and Installation".
 Front wiper arm
Exploded View
Wiper blade (RH)
Wiper arm (RH)
Wiper drive assembly
Wiper arm (LH)
Wiper blade (LH)
Removal and Installation
REMOVAL
Remove the wiper arm cap.
Remove the wipe ...
 Front wiper drive assembly
Exploded view
Wiper blade (RH)
Wiper arm (RH)
Wiper drive assembly
Wiper arm (LH)
Wiper blade (LH)
Removal and installation
REMOVAL
Remove the cowl top. Refer to EXT-26, " ...
Other materials:
Rear regulator
Exploded View
Rear door panel
Rear door glass regulator motor
Rear door glass regulator
Rear door glass
Rear door glass rubber run
Removal and Installation
NOTE:
RH rear door panel shown; LH side similar
REMOVAL
Remove the rear door finisher. Refer to INT-19, "Removal ...
Intermittent Incident
DESCRIPTION
Sometimes the symptom is not present when the vehicle is brought in for
service. If possible, re-create the
conditions present at the time of the incident. Doing so may help avoid a No
Trouble Found Diagnosis. The fol-
lowing section illustrates ways to simulate the conditions/env ...
Rear combination lamp
Exploded view
Rear combination lamp
Rear turn signal lamp bulb
Rear turn signal lamp socket
LED lamp harness connector
Rear combination lamp harness
connector
Back-up lamp bulb socket
Back-up lamp bulb
Removal and installation
Removal
Partially remove trunk side finis ...
