Nissan Sentra Service Manual: Clutch piping
Exploded View
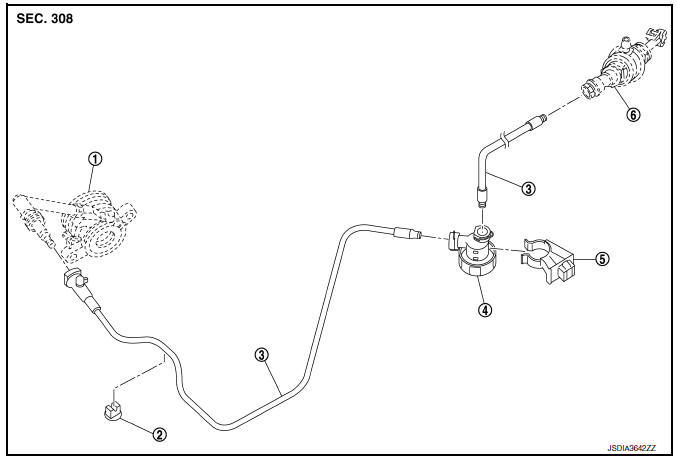
- CSC (Concentric Slave Cylinder)
- Clip
- Clutch tube
- Clutch damper
- Bracket
- Clutch master cylinder
Hydraulic Layout

- Clutch tube
- Lock pin
- CSC (Concentric Slave Cylinder)
- Clutch damper
- Clutch master cylinder
- Clutch pedal
Removal and Installation
CAUTION:
Keep painted surface on the body or other parts free of clutch fluid. If it spills, wipe up immediately and wash the affected area with water.
NOTE:
When removing components such as hoses, tubes/lines, etc., cap or plug openings to prevent fluid from spilling.
REMOVAL
- Drain clutch fluid. Refer to CL-7, "Draining".
- Press the lock pin into the bleeding connector of the CSC, and then remove clutch tube from CSC.
- Pull outward on the lock pins from the connectors of the clutch damper until the pins stop, and then remove clutch tubes from clutch damper.
- Pull outward on the lock pin from the connector of the clutch master cylinder until the pin stops, and then remove clutch tube from clutch master cylinder.
INSTALLATION
Installation is in the reverse order of removal.
CAUTION:
Do not damage clutch tube.
- Insert each clutch tube into the CSC bleeding connector, the clutch damper connector, and the clutch master cylinder connector until it contacts the end of each connector
- Install each lock pin into the clutch damper connector and the clutch master cylinder connector until it contacts the end of each connector.
Inspection and Adjustment
INSPECTION AFTER REMOVAL
- Check the clutch tube for cracks and damage. If the clutch tube has cracks or damage, replace it with a new one.
- Check the O-ring of the clutch tube for cracks and damage. If the O-ring of the clutch tube has cracks or damage, replace clutch tube with a new one.
CAUTION:
Do not reuse O-rings.
- Check the clutch damper for cracks and damage. If the clutch damper has cracks or damage, replace it with a new one.
INSPECTION AFTER INSTALLATION
- Check the fluid leakage and the fluid level. Refer to CL-7, "Inspection".
- Check the clutch pedal height. Refer to CL-5, "Inspection and Adjustment".
ADJUSTMENT AFTER INSTALLATION
Perform the air bleeding procedure. Refer to CL-9, "Air Bleeding".
 Clutch master cylinder
Exploded View
Reservoir hose
Reservoir tank
Clutch master cylinder
Removal and Installation
REMOVAL
CAUTION:
Keep painted surface on the body or other parts free of clutch
flui ...
 CSC(concentric slave cylinder)
Exploded View
Transaxle assembly
CSC (Concentric Slave Cylinder)
Removal and Installation
CAUTION:
Do not reuse CSC (Concentric Slave Cylinder). The CSC slides back
to the origina ...
Other materials:
Continuously Variable Transmission (CVT) (if so equipped)
WARNING
Do not depress the accelerator pedal
while shifting from P (Park) or N (Neutral)
to R (Reverse), D (Drive) or L (Low).
Always depress the brake pedal until
shifting is completed. Failure to do so
could cause you to lose control and
have an accident.
Col ...
Ecu diagnosis information
Ipdm e/r (intelligent power distribution module engine room)
Reference Value
Values on the diagnosis tool
Terminal layout
Physical values
Fail-Safe
Can communication control
When can communication with ecm and bcm is impossible, ipdm e/r performs
fail-safe ...
Precaution for Supplemental Restraint System (SRS) "AIR BAG" and "SEAT BELT
PRE-TENSIONER"
The Supplemental Restraint System such as “AIR BAG” and “SEAT BELT PRE-TENSIONER”,
used along
with a front seat belt, helps to reduce the risk or severity of injury to the
driver and front passenger for certain
types of collision. Information necessary to service the system ...
